
Introduction
In this blog, we are going to use Power Automate Flow through Power Pages to achieve business requirements. Using Power Automate saves lots of time and is easy to use.
Let’s Jump into the scenario where we are going to create a record of a custom entity named “Policy” which is related to contact through an N:1 relationship. Policy entity consists of Start Date, End Date, Name, and Contact fields. In Start Date, today’s date will be set, and based on how many years the user has taken the policy the End Date will get set.
To create a site using Power Page with the template of your choice, kindly access the following link. For this demonstration, we have configured a public portal that will be accessible to all. You can customize the site according to your business needs, also, you can set the privacy settings as desired. We designed our site as shown in the below image where the First Name, Last Name of the contacts are displayed. There is an input field where users can specify the purpose for taking the policy in the read-only grid and there also are two buttons that allow users to proceed with the policy according to their preferences.

Step 1 – Create a solution from Power Pages -> New -> Automation -> Instant Power Automate flow -> Skip -> Power Pages Connector -> Select When Power Pages call a flow trigger.
Then enter some input variables as shown in the below screenshot

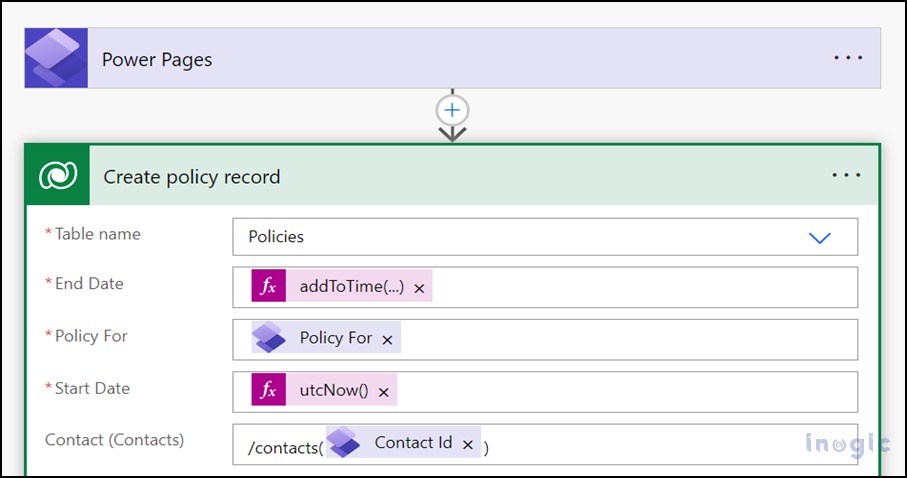
Step 2 – Add a new step -> Choose Microsoft Dataverse Connector -> Add a new row -> Select Policies entity.
And then add the below formulas for the respective fields and save it.

End Date: addToTime(utcNow(),int(triggerBody()[‘text_2′]),’Year’)
Start Date: utcNow()
Step 3 – Navigate to Home from Power Pages and then edit the respective Site from the list of Active Sites using the Edit button. Then click on Set Up and Cloud Flows. Then using the Add button add the respective Cloud flows to your respective site. Select and edit the respective flow, from where you can Add respective Roles and the flow shall run only for the user with the selected role.


Note: Copy and store the URL as it will be used later in the code.
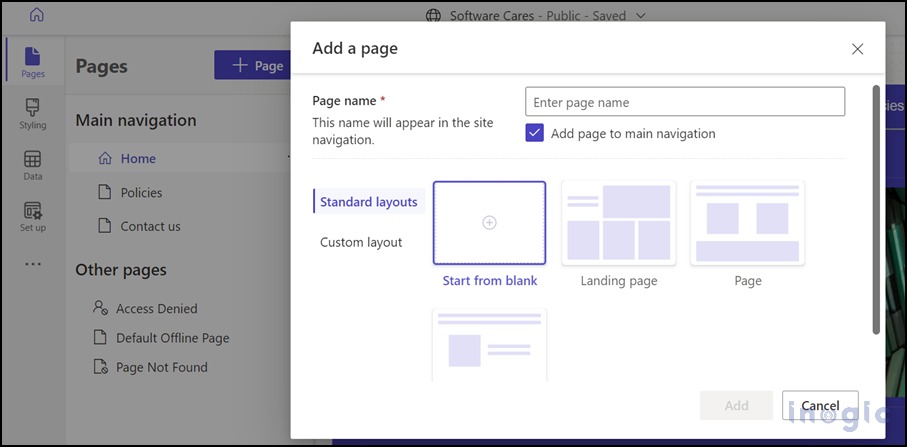
Step 6 – Navigate to the pages -> Added new Page -> Start from blank -> Edit with visual studio code.

Replace the HTML code with the below code. In the below code, we are fetching the contact record. On click of those buttons, we called a function named “CreateRecord()” which is taking parameters contactid and year respectively. When a user clicks on the desired button which is “1 Year” or “3 Year we have passed the number of years respectively i.e., “1” for a one-year policy and “3” for a three-year policy.
Inside the function, we created a data JSON and passed it in the post request for Power Automate Flow which will create the policy record. In the code, we have added the URL which we got in Step 4.
div class="sectionBlockLayout text-left"> {% fetchxml contact %} <fetch version="1.0" output-format="xml-platform" mapping="logical" distinct="true" returntotalrecordcount="true"> <entity name="contact"> <attribute name="firstname" /> <attribute name="lastname" /> <attribute name="contactid" /> <order attribute='firstname' descending='false' /> <filter type="and"> <condition attribute="firstname" operator="not-null" /> </filter> </entity> </fetch> {% endfetchxml %} {% if contact.results.total_record_count > 0 %} <div style="width:100%"> <table class="styled-table"> <th>First Name</th> <th>Last Name</th> <th>Taking Policy For</th> <th>Get Policy</th> {% for contactRecord in contact.results.entities %} <tr> <td>{{contactRecord.firstname}}</td> <td>{{contactRecord.lastname}}</td> <td><input type="text" required id="{{contactRecord.contactid}}" placeholder="Enter Your Input" /></td> <td> <button onclick="CreateRecord('{{contactRecord.contactid}}','1')">1 Year</button> <button onclick="CreateRecord('{{contactRecord.contactid}}','3')">3 Year</button> </td> </tr> {% endfor %} </table> {% else %} <h2>No records found.</h2> {% endif %} <script> function CreateRecord(contactid, year) { var policyfor = document.getElementById(contactid).value; var _url = "https://softwarecares.powerappsportals.com/_api/cloudflow/v1.0/trigger/ed758f6e-fdff-46f1-bd60-fab3df53711b"; //add the URL you got while adding the flow var data = {}; data["Policy For"] = policyfor; data["Contact Id"] = contactid; data["Year"] = year; var payload = {}; payload.eventData = JSON.stringify(data); shell .ajaxSafePost({ type: "POST", contentType: "application/json", url: _url, data: JSON.stringify(payload), processData: false, global: false, }) .done(function (response) { console.log(response); }) .fail(function (error) { console.log("failed" + error); }); } </script> </div> </div>
Now visit the site where you can see the below pop-up click on sync and the changes we have made in the code will get synchronized.

After that, you can see the “No records found” on the web page. But when you will open it in the preview you can see the records as shown in step 1.


After clicking the policy button our flow will be called and the policy record will get created based on how many years the user is taking the policy for.

Conclusion
Thus, we learned how to create a record through Power Automate Flow when we want to create a record using Power Pages with some calculated values and logic.
The post How to use Power Automate Flow in Power Pages first appeared on Microsoft Dynamics 365 CRM Tips and Tricks.
